
Understanding Ticket Assignment Notifications
Updated 9/1/20262 min read
The moment a ticket is assigned to you, Hoicko sends a structured, automated notification — not just a bare "you have a new ticket" alert, but a genuinely useful summary containing everything needed to make an initial priority call before you've even opened the full board.
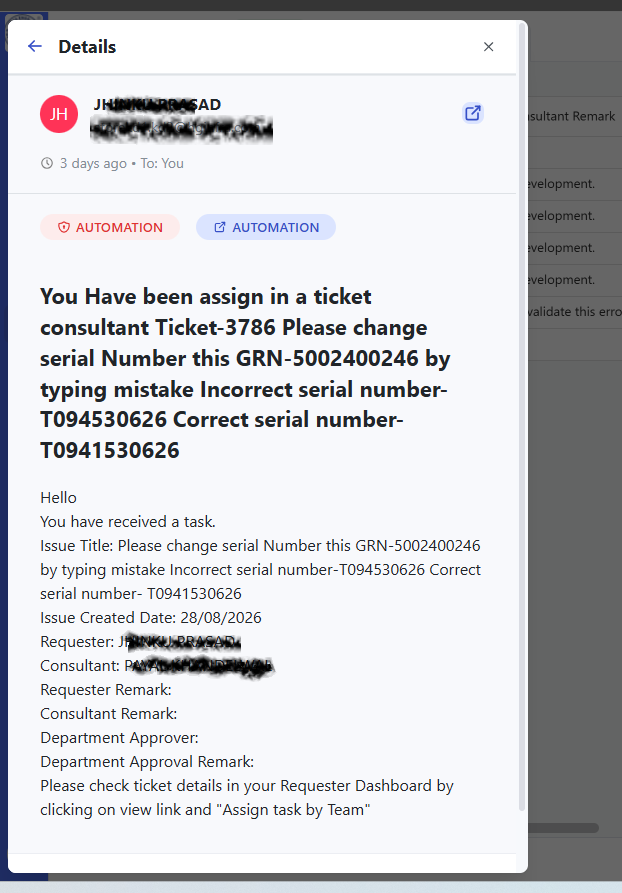
Reading the notification, section by section
- The AUTOMATION badge — this tag confirms the message was generated by a workflow rule rather than typed by a person, so you immediately know it's a reliable, system-triggered event rather than an informal @mention.
- The title line — this combines the ticket number and a core summary of the issue in a single sentence (for example, "You have been assign in a ticket consultant Ticket-3786 Please change serial Number this GRN-5002400246 by typing mistake..."). Even without opening anything else, this line alone often tells you enough to gauge urgency.
- Issue Title — the fuller description of exactly what needs to be done, expanding on the title line.
- Issue Created Date — when the ticket was originally raised. This is genuinely useful context: a ticket created three weeks ago and just now assigned to you carries a very different urgency profile than one created an hour ago.
- Requester — who raised the ticket, so you immediately know who to contact with clarifying questions rather than needing to open the full record first.
- Consultant — confirms current ownership, which should match you if you're receiving this specific notification.
- Requester Remark, Consultant Remark, Department Approver, Department Approval Remark — these typically show as blank in a fresh assignment notification and populate naturally as the ticket progresses through its lifecycle; seeing them blank isn't an error.
- The closing instruction line — usually tells you exactly where to go next, for example: "Please check ticket details in your Requester Dashboard by clicking on view link and 'Assign task by Team.'"
Why this level of detail in a notification actually saves time
Because the notification contains genuine context (not just a bare alert), you can often make an initial priority decision — is this urgent, does it need to jump the queue — without switching screens at all. You only need to open the full ticket record once you're ready to actually begin work, which cuts down on unnecessary context-switching throughout the day.
FAQs:
Q 1. How do I know a notification is automated?
Look for the "AUTOMATION" badge.
Q 2. What should I do first after getting one?
Open the ticket via the view link and check Status and remarks.
Q 3. Why are some fields blank in the notification?
They simply haven't been filled in yet.
Q 4. Can I reply directly from the popup?
No — open the full ticket to add remarks or comment.
Q 5. Will status changes send new notifications too?
Depends on your workspace's automation setup.
Q 6.What if the instructions mention "Requester Dashboard" but I'm the consultant?
It just means open your dashboard view of the ticket.
Related content
Is this article helpful?
Help us improve our articles.