
How to Raise a New SAP Support Ticket in Hoicko"
Updated 9/1/20265 min read
Raising a support ticket the right way, on the first attempt, is the single biggest lever you have over how quickly your SAP issue gets resolved. A vague ticket ("SAP not working") forces the consultant to come back with three or four clarifying questions before they can even start — and each round-trip can add a full business day to resolution time. A well-filled ticket, by contrast, gives the consultant everything they need to triage, prioritize, and begin work immediately.
Hoicko's SAP Support Ticket Form exists precisely to remove that friction. Instead of relying on email threads, WhatsApp messages, or verbal handoffs — all of which lose context and are impossible to search later — every request is captured once, in a structured format, and immediately becomes trackable, assignable, and reportable. This article walks through exactly how to fill it out, field by field, so your ticket lands with the right person the first time.
Why a structured form beats email or chat for support requests
When a request lives only in an email inbox, it's invisible to reporting, invisible to SLA tracking, and invisible to anyone except the one or two people cc'd on that thread. If that person goes on leave, the request effectively disappears. A ticket raised through Hoicko's form, on the other hand, is immediately visible on the board, counted in dashboard totals, and routable through automation — regardless of who is in or out of office that week.
Step-by-step: filling out the form
Step 1 — Open the SAP Support Ticket Form. From your Hoicko workspace, click "+ New Ticket," or navigate to the board your team uses to log SAP tickets and select New Item → Form View. This opens the form titled "SAP Support Ticket Form — To Get smarter responses of your problems."
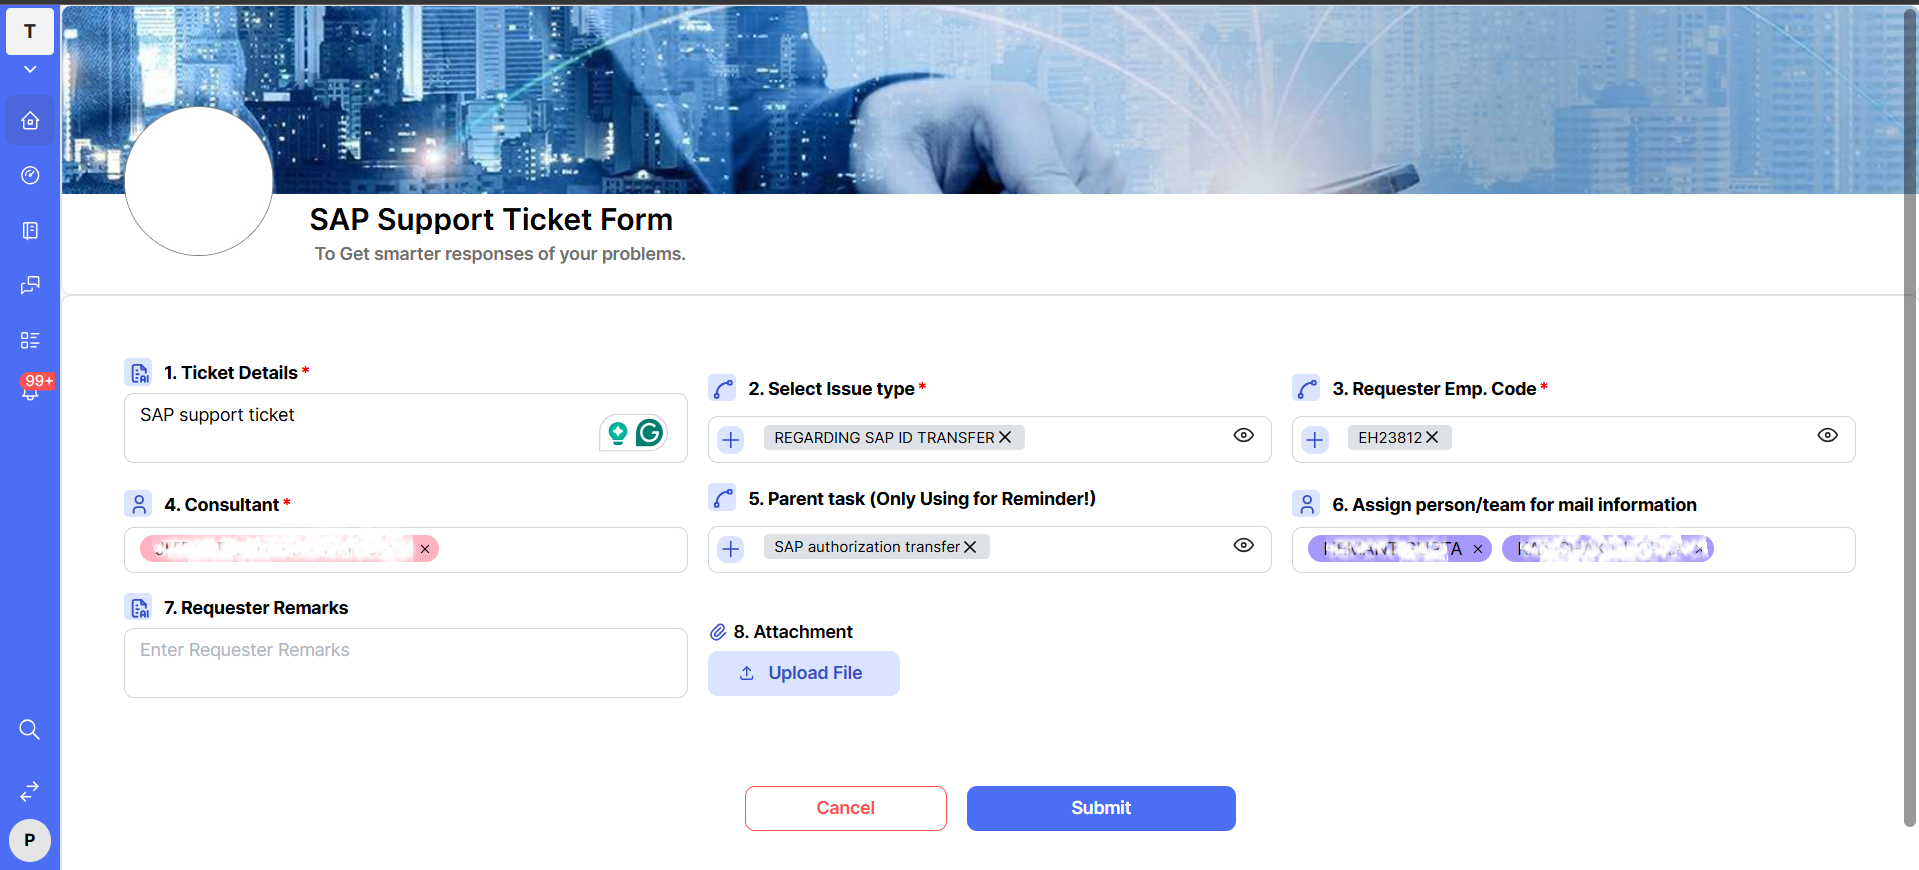
Step 2 — Write clear Ticket Details. This is the single most important field for everyone downstream of you. Avoid generic titles like "SAP support ticket" or "issue" — instead, describe the actual symptom: "GRN serial number mismatch on plant transfer," or "PO not syncing to QAS after last transport." A specific title does three things at once: it helps the consultant triage severity instantly, it makes the ticket findable later via search, and it prevents duplicate tickets from being raised for the same underlying issue by different people.
Step 3 — Select the correct Issue Type. The Select Issue Type field is a multi-select tag dropdown (for example, "Regarding SAP ID Transfer," "Module Postings," or "Authorization Request"). This field is not cosmetic — it is the primary input that Hoicko's automated routing rules use to decide which consultant or team the ticket lands with. Picking "Other" when a closer category exists effectively removes the benefit of automation and sends your ticket to a general queue for manual sorting, which is slower.
Step 4 — Enter your Requester Emp. Code. Your employee code (e.g., EH23812) links this specific ticket back to your individual record. This is what powers personal dashboard widgets like "Total Count of New Plant Ticket" and lets managers filter reports by requester when they need to see how many issues a particular team or plant is raising.
Step 5 — Assign the Consultant. Choose the SAP consultant responsible for the affected module. If you genuinely don't know who owns a given module, it's better to ask your team lead than to guess — an incorrectly assigned consultant simply gets reassigned later, adding delay rather than saving time.
Step 6 — Decide whether you need a Parent Task. The Parent Task (Only Using for Reminder!) field exists specifically to link a new ticket to an existing one purely as a visual reminder — not to build a hierarchy or dependency chain. Only use it if this ticket is genuinely a "follow-up" or "don't forget" note tied to a previous request.
Step 7 — Add people to "Assign person/team for mail information." Anyone listed here receives automated notifications as the ticket progresses, independent of who is actually doing the resolution work. This is useful for keeping a manager, a business owner, or a secondary stakeholder informed without making them the ticket's official owner.
Step 8 — Write Requester Remarks and attach evidence. Use Requester Remarks to add anything a screenshot alone can't convey: steps to reproduce the issue, business impact, or a deadline. Then use Upload File under Attachment to add screenshots, error logs, or reference documents. Tickets with a screenshot attached are resolved measurably faster on average, simply because the consultant doesn't need to ask "can you send a screenshot?" as their first reply.
Step 9 — Review and Submit. Before clicking Submit, scan every field marked with a red asterisk (*) — these are mandatory and the form will not save without them. Once submitted, the ticket receives a unique Ticket ID, appears on the relevant board, and triggers any configured automations (covered in detail in the Automated Routing & Escalations category).
Common mistakes to avoid
- Writing a title so generic it could apply to ten different problems.
- Selecting "Other" as Issue Type out of habit instead of checking for a closer match.
- Leaving Requester Remarks blank on anything more complex than a one-line request.
- Forgetting to add stakeholders under "Assign person/team for mail information," which then requires manually forwarding updates later anyway.
FAQs:
Q 1. What happens after I click Submit?
The ticket gets a unique ticket ID, and automations notify the assigned consultant and team immediately.
Q 2. Which fields are mandatory?
Fields marked with a red asterisk—typically Ticket Details, Issue Type, Emp. Code, and Consultant.
Q 3. Can I edit a ticket after submitting it?
Yes — open it from the board and edit any field, including status and attachments, anytime.
Q 4. Why avoid selecting "Other" for Issue Type?
It drives automated routing, so a specific category gets your ticket to the right consultant faster.
Q 5. Can I attach multiple files to one ticket?
Yes, the Attachment field supports multiple uploads in a single submission.
Q 6. Who can see the ticket I raise?
The assigned Consultant, anyone added for mail notifications, and board admins by default.
Related content
Is this article helpful?
Help us improve our articles.